A Chugger Pump is often an essential piece of brewing equipment that holds a special place in many avid homebrewer’s hearts. In its simplest form, it is used to transfer hot and cold liquids between brewing vessels. Over time, however, many homebrewers have encountered what seems to be the common issue of a noisy Chugger Pump. All it takes is a simple Google search, and you will easily find a plethora of articles, videos, and forum posts where homebrewers are complaining of the issue and attempting to solve it. Typically it begins with the pump vibrating, then the vibrations quickly escalate into a loud, grinding or screeching noise until finally, the pump stops moving liquid entirely. This well-documented problem has even been mentioned in Brew Your Own magazine, when Chugger released its newest pump (Chugger X-Dry Pump) that was actually marketed against the noisy problem.
Identifying the Problem: What IS that noise?!
For many years, homebrewers have been blaming this painful screeching sound on cavitation, which is defined as the formation of an empty space (in a solid object) or bubbles (in a liquid), typically by the movement of a propeller through it. Cavitation occurs when air is introduced into the pump head and impellers. When a pump cavitates, the paddle inside is basically free-wheeling and the RPM’s rise sharply, which makes the distinct whining/grinding noise mentioned previously. Of course, a pump is never silent, and there is indeed a “normal” pump sound that can be heard any time the pump is running, but the noise we’re referring to here is a very sharp, distinct sound.
But Wait…Is The Chugger Actually Cavitating?
With over 30 years of experience in the HVAC industry, Kenny has witnessed his share of cavitation in various types of pumps and circulators. In these instances, motors would actually speed up because it was free-wheeling in the air without any resistance or back pressure. However, we began to notice with the Chugger Pump that when it emitted the sound, the pump motor was actually slowing down (and in some cases, coming to a complete stop), which clued us into the fact that cavitation may not be the culprit. The lack of liquid in the pump causes the impeller to speed up, as there is very little resistance (i.e. cavitation). However, when liquid is present, the pump should act it’s nominal speed. Therefore, when the Chugger begins to vibrate and make the dreaded noise we’ve been referring to throughout this article, this is indicative of mechanical resistance, not cavitation.
Taking a Closer Look
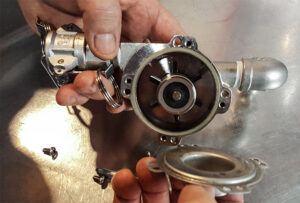
Kenny’s first thought (after coming to the conclusion that it was not cavitation causing this noise) was that the impeller was possibly binding on the shaft of the pump. From there, he began to disassemble the Chugger Pump, removing the screws on the outside cover, the screws on the inside cover, and then finally removing the actual impeller from the shaft to inspect it more closely. Upon initial inspection, which included manually spinning the impellers, he realized that he could re-create the same noise. The impeller was actually bouncing on the shaft as it turned, causing deflection.
Attempt #1 to Fix
After thinking we’d figured out the problem (the noise being caused by the impeller binding on the shaft), Kenny attempted to lubricate the impeller shaft with a few drops of olive oil. While this solution did work to an extent while running the pump dry, the results were not sustained when hot liquid was reintroduced, and the terrible noise returned just minutes after the oil had washed away. Therefore, while in some ways proving our initial hypothesis that the issue was deflection and not cavitation, we still had to go back to the drawing board for a solution.
Back to Square One and Our Next Discovery
The next discovery we made was an important one. When testing the pump with liquids of different temperatures and viscosities, we quickly realized that the noise would occur at a much greater rate when extremely hot (180 degree +) water was used. We believed that since water has a low viscosity and therefore lubrication ability, the higher temperatures were causing the potential for the noise. This belief was furthered when we noted that the problem occurred more frequently with plain hot water versus wort, which has a higher viscosity due to the dissolved sugars and other elements present. Having a higher viscosity than water, we noticed that wort produced the noise far less frequently when compared with plain water, as the hot water provided insufficient lubrication to the impeller riding on the stainless steel shaft.
Attempt #2 to Fix
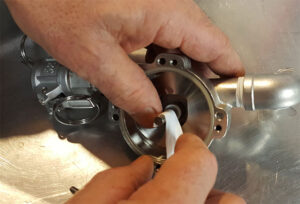
With our new knowledge that both temperature and viscosity affected the frequency of the noise coming from the pump, we disassembled the Chugger Pump once again and searched for something to put on the shaft to mitigate the deflection at these extremely high temperatures. Coincidentally, there was a roll of 3/4” Teflon tape nearby. After trimming a small piece (approximately 1 1/4” – 1 1/2” in length) and wrapping it around the shaft in a clockwise direction (about 1.5 times around), we slowly fit the impeller back onto the shaft (also in a clockwise direction to ensure the Teflon tape didn’t pull). After reassembling the Chugger Pump and turning it on, we were happy to hear it running both smoothly and quietly! But we were not out of the woods yet – the real test would be under brew conditions with extremely hot water. We fired up the hot liquor tank, cranked it to 200 degrees, and tested the newly repaired pump. To our delight, the pump ran smoothly and quietly!
The Solution
As it turned out, the solution for the problem of a noisy Chugger Pump was, in fact, fairly simple. Creating a lubricating cushion or bearing surface between the shaft and impeller was the key to solving the problem that has been irritating brewers (including ourselves) all over the world for years! Simpy wrap the outside diameter of the impeller 1.5 times with Teflon tape, slide the impeller over the Teflon tape (in the same clockwise direction) and voila! You’ve got yourself a quiet, functioning Chugger Pump! One thing we would suggest though is to change the Teflon tape each time you open up the pump for sanitation reasons – approximately every 5-6 brews. This will ensure your brew days from here on out are as smooth and quiet as can be!
Thanks for putting this solution out there.
Ive got approximately 12 brews on my 60L system which utilizes two Chugger pumps. Lucky I have a third pump as a spare.
During my last brew my pump was becoming magnetically decoupled while pumping from the kettle through the Hopback and HX into the FV.
This had never happened before. I reconfigured using my second pump, normally only used from HLT to Mash Tun. The same exact thing occurred.
I pulled my spare pump out and alas it saved the day while balanced on an inverted bucket.
It was suggested by Chugger that I ream the impeller hole out with a 17/64″ drill bit. I did so and was shocked with how much material was removed. The impeller seemed a little “sloppy” now in my opinion. I decided I wanted to test the pump out with boiling hot water before brewing again. I hooked up pump #1 and within 15 seconds it began making a nasty noise and stopped moving fluid. Damn!
Back to the Internet, where I came upon your video/page and promptly tried in with two wraps of 1/2″ teflon tape as its all I have. The pump has now been running now for 1/2 hour with the boiling hot water. All is good.
I am hoping this is a good fix.
I was a little concerned that perhaps my suction line which is a 7/16″ ID may be starving my pump? The pump has both 1/2″NPT inlets and outlets. I’m thinking not considering I’ve used them for over 12 batches prior with no issues. What do you think?
Also, why would a “sloppy” fit cause the pump to stop pumping? I understand it making a lot of noise as it’s wobbling on the stationary shaft, but stop pumping? I don’t fully understand.
I really appreciate you insightful video and page and would be grateful for anything you can add to help me with my issues.
Sincerely,
Randy
Cobourg ON
Canada
Hi Randy. Glad to have been a help. As far as drilling to 17/64 seems like they had you going in the wrong direction. I’m not sure how long the Teflon tape will hold up with a bigger gap. I would consider purchasing a replacement impeller. The reason for the impeller binding and decoupling is instead of the I.D of the impeller riding on the O.D of the shaft on the whole length and radius it is riding on two pressure points at opposite ends. The friction at this two points is causing the impeller to bind and decouple. I don’t think you have to worry about the inlet being undersized as long you keep your pumps under the liquid line of the vessels.
Kenny
THIS IS NOT A RECCOMENDED SOLUTION FOR THIS….WHEN THERE IS EXCESS HEAT BETWEEN THE IMPELLER AND THE SHAFT THRE WILL BE SWELLING( RUN DRY OR CAVITATION WILL CAUSE THIS ) REEMING THE IMPELLER IS THE BEST SOLUTION. WE ALSO HAVE THE NEW X-DRY IMPELLER (FOOD GRADE HARDENED CARBON BEARING WHICH ALLOWS THE PUMP TO RUN DRY NO DAMAGE.