In the world of brewing beer, the magic isn’t just in the ingredients or the brewing process; it’s also encapsulated in the crucial moments of cooling the wort. Wort chillers, whether they’re counterflow, plate, or immersion, play a pivotal role in this stage, ensuring your brew transitions smoothly from a vigorous boil to the perfect temperature for fermentation while also cooling fast enough to create a strong cold break. But, as with all brewing equipment, the secret to their efficiency lies not just in their use but in their care. Cleaning your wort chiller might not be the most glamorous part of brewing, but it’s undoubtedly one of the most essential. A well-maintained chiller means a clearer beer, better flavor stability, and, ultimately, a more satisfying brewing experience.
Navigating the cleaning of different types of wort chillers can be daunting, especially with the variety of designs and materials in play. But fear not! This comprehensive guide is designed to fully explain the process, providing you with detailed steps and tips to ensure your wort chiller remains in peak condition, batch after batch.
We’ve been in the brewing industry for over 15 years, and during that time we’ve learned the hard way, whether you’re a seasoned brewer or just starting out, understanding how to properly clean and maintain your chiller is one of the keys to brewing success.
Quick links To Specific Wort Chiller Cleaning Sections
Introduction to Cleaning Agents in Brewing
With a variety of materials used home and commercial brewing environments, from stainless steel to copper, choosing the right cleaning agents becomes a task requiring both knowledge and experience. A well-chosen cleaning agent not only ensures that your equipment is free from organic residues and potential contaminants, but also helps maintain the equipment’s integrity over time.
Brewing equipment can accumulate a range of residues, including proteins from grains, oils from hops, and mineral deposits from water. These residues, if not properly cleaned, can harbor bacteria and wild yeast, leading to off-flavors and infections in your brew. Moreover, the cleaning process itself, if done with inappropriate agents, can damage the equipment, affecting its performance and lifespan.
Cleaning Agents for Brewing: A Diverse Arsenal
The market offers a diverse arsenal of brewery cleaning agents, each designed to tackle specific challenges. From alkaline solutions, ideal for general organic residue removal, to acidic and caustic cleaners, effective against stubborn mineral deposits and specific types of residue, understanding the properties and applications of these agents is key to their effective use.
Alkaline Cleaners for Copper Chillers
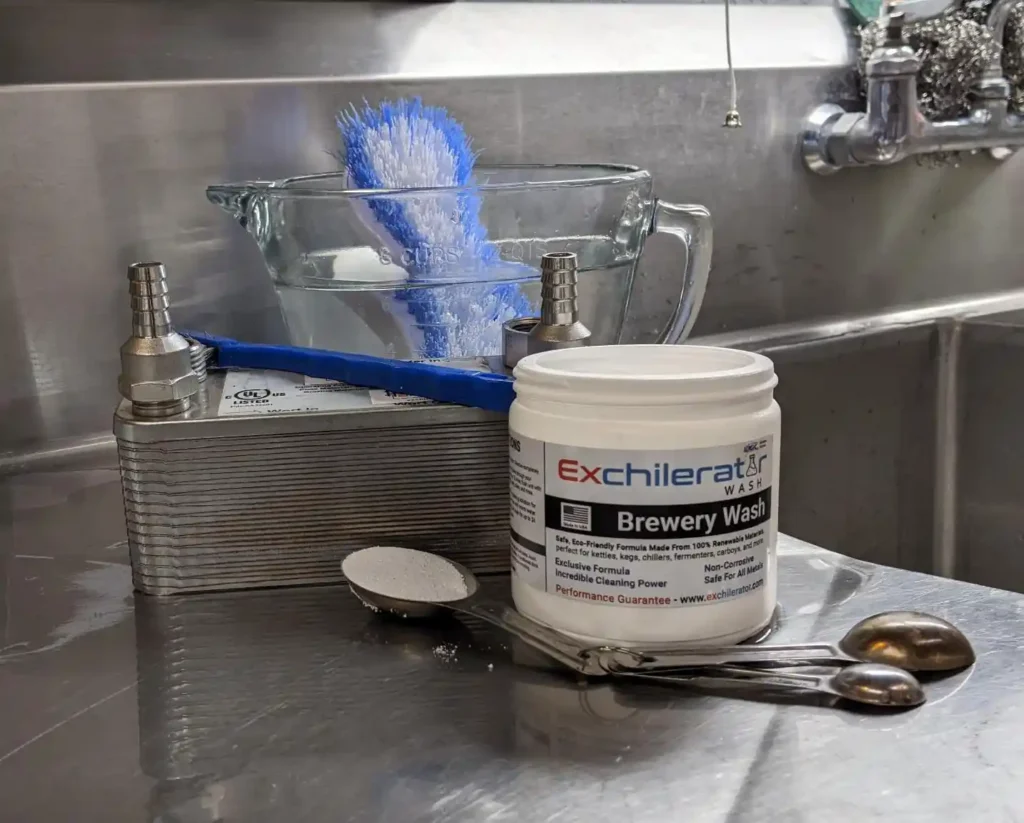
Copper, with its excellent thermal conductivity, is a popular choice for brewing equipment, particularly for chillers. To maintain copper’s integrity while effectively cleaning it, alkaline cleaners such as Exchilerator Brewery Wash are recommended. These cleaners excel in breaking down organic residues like hop oils and grain proteins without harming the copper material. It’s this gentle yet effective cleaning action that makes alkaline solutions ideal for copper surfaces and wort chillers, ensuring they remain functional and free from corrosive damage over numerous brewing cycles.
Considerations for Stainless Steel Chillers
While alkaline cleaners can do a fantastic job on stainless, stainless steel chillers can offer additional flexibility when it comes to cleaning options. For these durable units, both acidic and caustic cleaners can additionally be employed, depending on the nature of the residues present. Acidic cleaners are particularly effective against mineral deposits, such as beer stone (calcium oxalate) and water scale. Caustic cleaners, with their strong alkali content, are powerful against heavy organic residues. However, it’s important to use these potent agents with care, following manufacturer guidelines to avoid damage to equipment and ensure user safety.
Balancing Cleanliness with Care
In choosing the right cleaning agent for your brewing equipment, the goal is to strike a balance between thorough cleanliness and the careful preservation of the equipment’s material. Whether opting for an alkaline cleaner, or navigating additional choices available for stainless steel, understanding the chemical interaction between the cleaner and the equipment material is crucial. By selecting the appropriate cleaning agents and employing them correctly, brewers can ensure their equipment remains in top condition, ready to produce delicious and safe brews batch after batch.
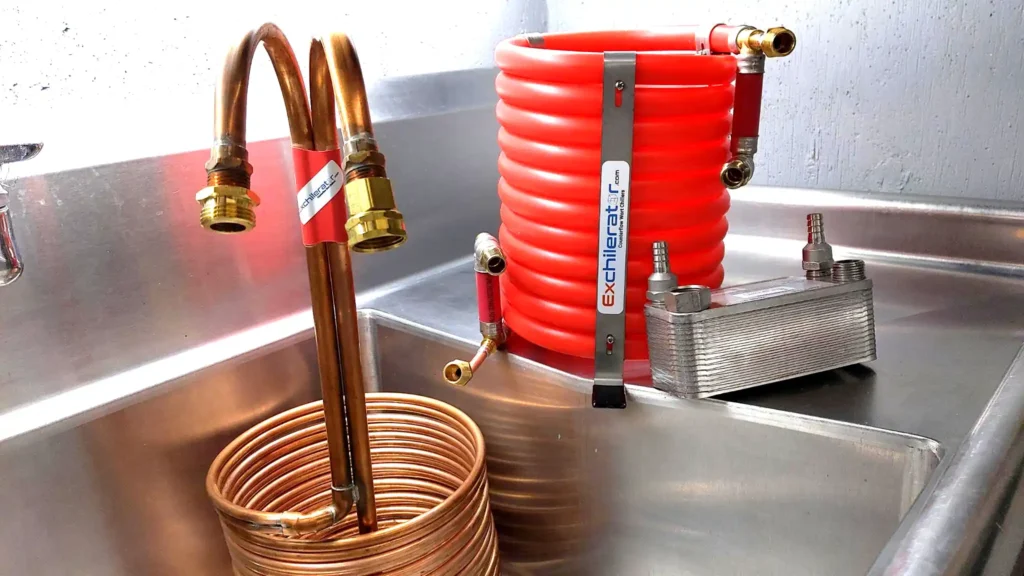
Cleaning a Counterflow Wort Chiller
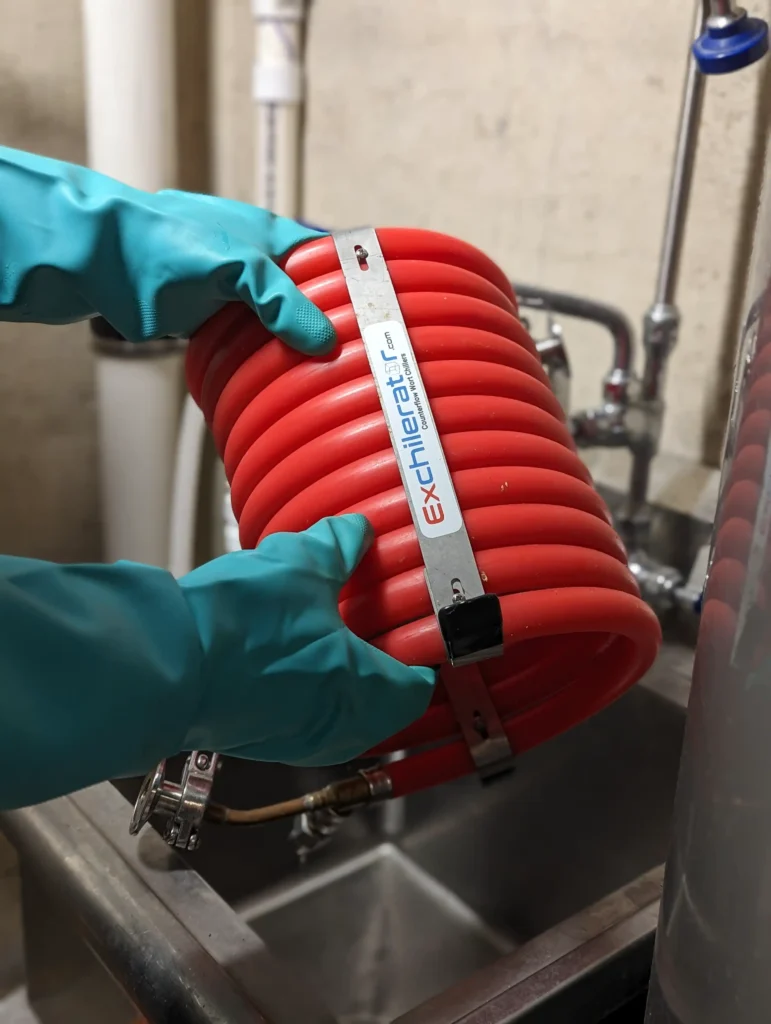
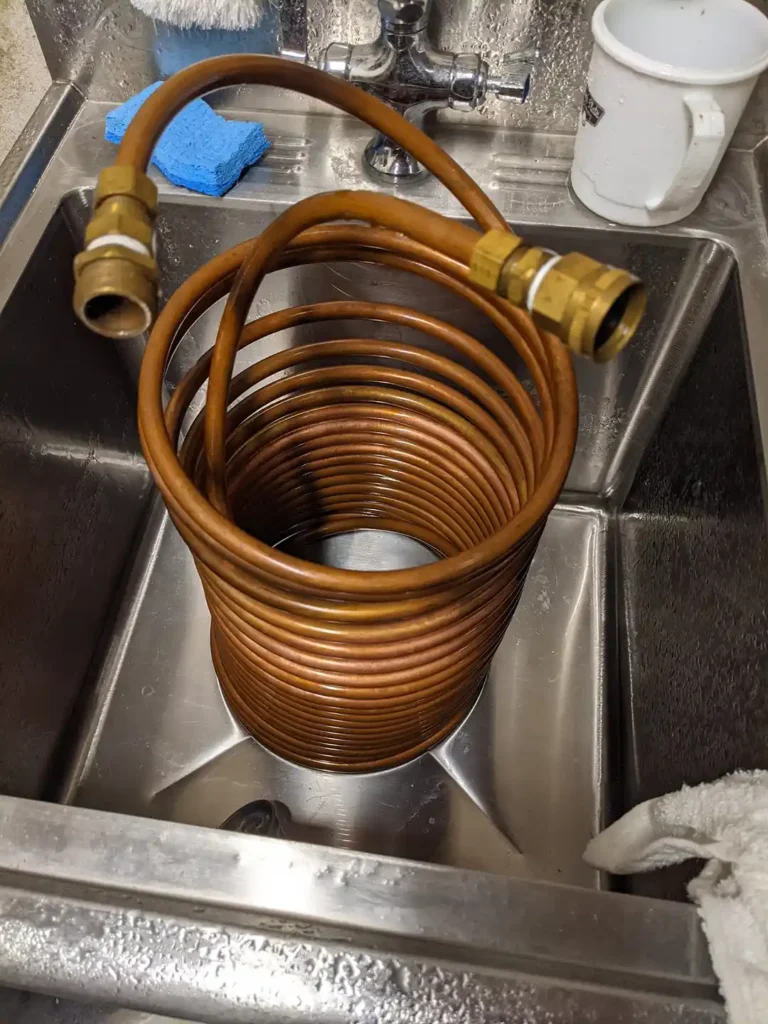
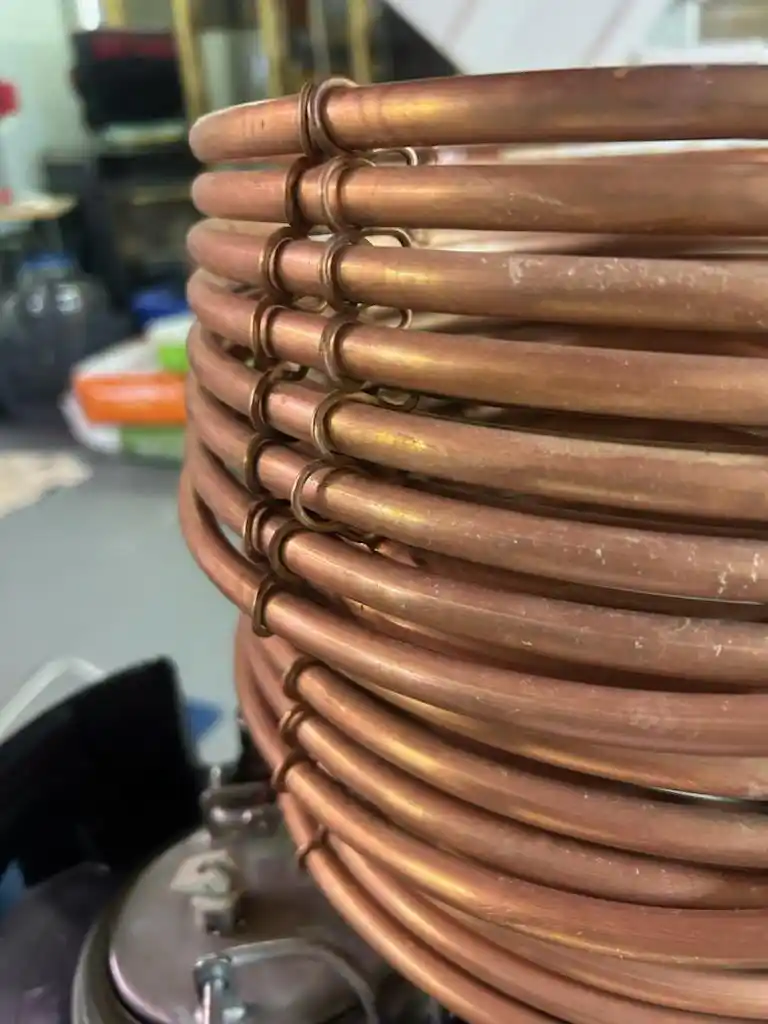
The counterflow wort chiller, a cornerstone in modern brewing technology, is essential for rapidly cooling the wort to fermentation temperatures. This piece of equipment, often made of copper for its excellent heat transfer properties, demands attentive care. Proper cleaning and maintenance are not just about preserving its efficiency; they are about ensuring the highest quality of your beer. Contamination from organic debris, mineral deposits, or microbial life can significantly impact the taste and safety of the brew, making thorough cleaning a critical aspect of the brewing process.
Quick Cleaning Guide
- Immediate Rinse: Flush the chiller with warm or hot water immediately after use.
- Deep Cleaning (When Necessary): For a thorough clean, use Exchilerator Brewery Wash with water at 130F – 160F.
- Effective Drainage: Tilt and rotate the chiller to ensure all water is drained out. Another option would be to use either a wet vac to suck the remaining water our or connect a low pressure CO2 line and push any residual liquid out. Never use compressed air from a compressor as they tend to have impurities such as oils etc that can contaminate your counterflow wort chiller.
- Proper Storage: Keep the chiller in a dry, clean, and secure environment to prevent mold or bacterial growth. We also recommend to never store your counterflow chiller in below freezing temperatures as a precaution in the event you do not get all the liquid out or forget to drain it properly.
Comprehensive Cleaning and Maintenance
Regular maintenance of your counterflow wort chiller is crucial. Each brewing session leaves a trail of hop residues, grain particles, and other organic materials in its wake. Without timely and comprehensive cleaning, these remnants can solidify, becoming challenging to dislodge and potentially serving as breeding grounds for bacteria.
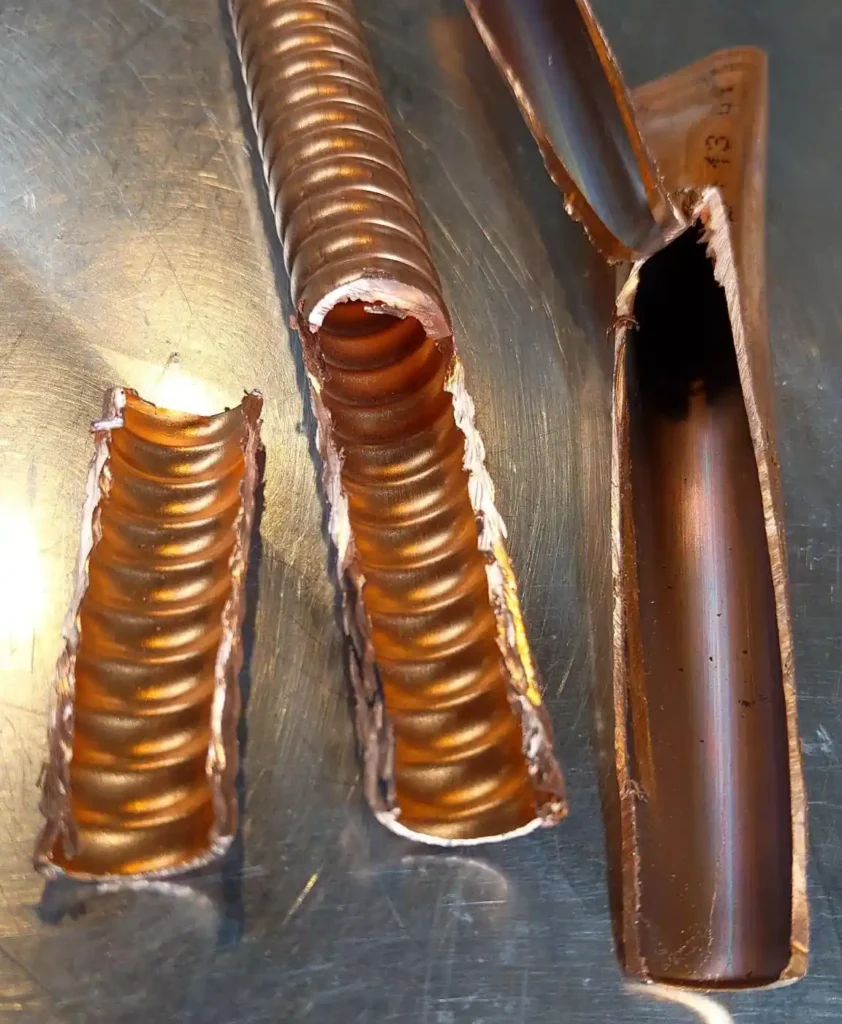
An important consideration in the maintenance of counterflow chillers is the design of their interior. These chillers come in two main types: those with smooth interiors and those with convoluted (or corrugated) interiors.
Smooth Interior Chillers:
The primary advantage of a smooth interior is the ease of cleaning. With no nooks and crannies for residues to hide in, a simple flush with hot water will often remove most, if not all, of the organic material. However, the smooth surface may not be quite as efficient in heat exchange compared to its convoluted counterpart, as the surface area is relatively limited, and the flow might not be as turbulent.
Convoluted Interior Chillers:
Convoluted or corrugated interiors, on the other hand, offer an increased surface area and create turbulent flow, which slightly enhances the heat exchange efficiency. The turbulence can ensure a more uniform cooling of the wort. However, the intricate design can make cleaning more challenging. Residues can get trapped in the crevices of the convolutions, requiring more thorough cleaning methods, such as using specific brewery cleaning solutions and more rigorous flushing or backflushing to ensure all residues are removed. This is especially important in the event you forget to clean your chiller immediately and any organic residues have time to dry or harden within the chiller.
Fun Fact:
Exchilerator Counterflow Chillers Strike A Balance Between Smooth & Convoluted For High Efficiency & Easy Cleaning
In addition to the conventional design considerations of smooth versus convoluted interiors, our counterflow chillers incorporate distinctive enhancements that set them apart. Specifically, the outside of our inner wort tube is wrapped with a helical wrap, ingeniously designed to induce turbulence on the water side of the heat exchange process. This innovative feature ensures that the cooling water tumbles as it moves, increasing the efficiency of heat transfer without complicating the cleaning process.
We also chose to double the standard 12′ cooling length provided by most counterflow chillers with a full 25′ feet of smoother copper tubing. This drastically enhances the surface area of our chillers and provides extremely efficient chilling capabilities.
When considering ease of cleaning versus efficiency, smooth interior chillers might be preferred by those prioritizing straightforward maintenance. However, for brewers who value efficiency and are willing to put in the extra effort in cleaning, a chiller with a convoluted interior could be the better choice. Each design has its pros and cons, and the best choice largely depends on individual brewing practices and preferences.
In-Depth Cleaning Process
- Initial Rinse: Begin with an immediate rinse using warm or hot water post-brewing. This step is crucial in removing most of the loose debris, preventing the setting of residues inside the chiller.
- Deep Cleaning Process: If the chiller has not been used for a while or if there is visible residue buildup, a deeper cleaning process using Exchilerator Brewery Wash is necessary. When mixed with water heated to 130F – 160F, this alkaline cleaner effectively removes stubborn residues. It’s essential to ensure that the cleaning solution reaches all parts of the chiller, as any missed spots can become breeding grounds for bacteria.
- Rinsing and Draining: After the deep cleaning, thoroughly rinse the chiller with water to remove any residual cleaning solution. Then, drain the chiller completely by tilting and rotating it. This step ensures that no water is left inside, which could lead to bacterial growth or contribute to off-flavors in your next brew. Alternative methods to this would be using a wet vac and sucking out the liquid while another option would be connecting a low PSI CO2 hose to the wort side and blowing out the liquid.
- Dry Storage: After draining, the chiller should be completely dry before being stored. Moisture can lead to mold growth and bacterial proliferation, which could contaminate subsequent brews. Storing the chiller in a dry, clean, and secure place that will not be subject to freezing temperatures is crucial for maintaining its cleanliness and structural integrity.
Additional Considerations for Copper Counterflow Wort Chillers
Copper’s exceptional thermal conductivity is one of the many reasons it stands out as a material of choice for brewing equipment. Over time, copper naturally undergoes oxidation, resulting in the development of a patina. Far from being merely cosmetic, this patina serves a protective role for the copper beneath. This natural layer shields the metal from further oxidation and degradation, ensuring the longevity and durability of your chiller.
Moreover, the formation of this patina can be advantageous for both the efficiency of heat exchange and the ease of cleaning. The smooth, protective layer that forms over the copper can enhance the thermal efficiency of the chiller, contributing to more consistent and effective cooling of the wort. From a maintenance perspective, this patina can also simplify cleaning processes. Unlike the rough surfaces that can result from corrosion or the buildup of brewing residues, the smooth patina allows for easier removal of organic debris and mineral deposits, making the chiller simpler to maintain in a clean and hygienic condition.
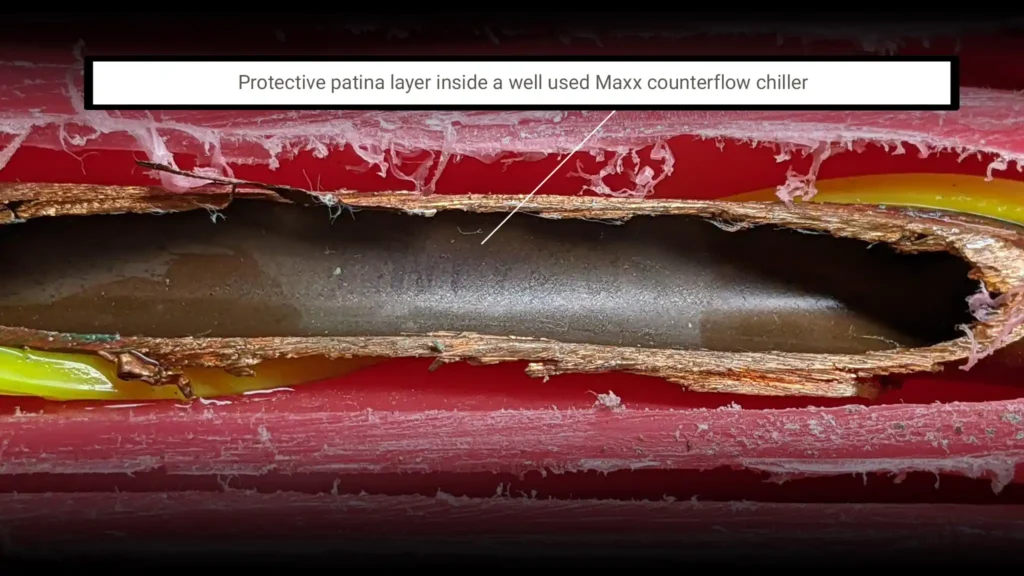
It’s important to understand that this patina is a desirable and beneficial aspect of copper’s aging process within a brewing context. Rather than attempting to remove this layer during cleaning, maintaining the patina should be a key consideration in the care of your copper wort chiller. Gentle cleaning methods that preserve this layer while removing brewing residues will help you harness the best of copper’s thermal properties and ensure your equipment remains in top condition for brewing excellence.
Importance of Sanitization During Brewing
In addition to cleaning, it’s crucial to understand the role of sanitization in the brewing process. While the cleaning process removes physical debris and residues, sanitization ensures the elimination of microbial life. For counterflow wort chillers, sanitization is typically achieved by recirculating boiling wort through the chiller before use. This step, separate from regular cleaning, ensures the chiller is not only clean but also sanitary at the start of the brewing process.
Conclusion
Maintaining your counterflow wort chiller through a consistent cleaning and sanitization process is vital for brewing high-quality beer. A well-cared-for chiller ensures that each batch of beer is not only delicious but safe to consume. The time and effort invested in maintaining your brewing equipment, particularly the counterflow wort chiller
Moving on from the intricacies of the counterflow chiller, we will next venture into the realm of plate chillers. While the principles of cleanliness remain the same, the structure and flow dynamics of plate chillers introduce new considerations for the diligent brewer. Let’s explore the tailored approach required to keep these compact, efficient units in top brewing condition.
How to Clean a Plate Chiller
Known for their efficiency in cooling wort rapidly due to their large surface area and compact design, plate chillers are a favorite among home brewers. However, their intricate design, consisting of numerous stacked plates through which the wort flows, can make them susceptible to clogging and contamination if not properly cleaned and maintained. Ensuring your plate chiller is meticulously cleaned is not just about maintaining the equipment; it’s about safeguarding the quality and taste of your beer.
In-Depth Understanding of Plate Chillers and Their Maintenance
Plate chillers, sophisticated yet straightforward in design, serve as a cornerstone in the efficient cooling of wort within both homebrewing and commercial brewing settings. They operate on the principle of passing wort and cooling water through alternating channels in a tightly stacked array of plates. This counter-current flow design not only optimizes the heat exchange efficiency but also introduces certain challenges, particularly when it comes to cleaning and maintenance.
Understanding the Structure and Flow
At the heart of a plate chiller’s design is its series of plates, each contributing to a vast surface area for heat exchange. The wort flows in one direction while cooling water flows in the opposite, allowing for rapid cooling. However, this efficient design also means that particles from the brewing process, such as hop matter and grain residues, can easily become lodged within the chiller’s narrow channels. Over time, without regular cleaning, these particles can accumulate, leading to potential clogs and creating environments conducive to bacterial and wild yeast proliferation.
Differences Between Brazed Plate Chillers and Commercial Scale Plate Chillers
When discussing plate chillers, it’s crucial to distinguish between the smaller-scale brazed plate chillers commonly used by homebrewers and the larger, commercial-scale plate chillers equipped with plates and gaskets, designed for disassembly and cleaning.
Brazed Plate Chillers
Typically found in homebrewing setups, brazed plate chillers are compact and sealed units where the plates are permanently joined together (brazed), usually with copper or nickel. This design makes them highly efficient and leak-resistant but also means they cannot be taken apart for cleaning. As such, brazed plate chillers require diligent external flushing and backflushing to remove residues and prevent blockages.
Commercial Scale Plate Chillers
Used in commercial breweries, these chillers are much larger and designed for higher-capacity cooling. Their most distinguishing feature is the assembly with plates and gaskets that can be disassembled for thorough cleaning and inspection. This modular design allows brewers to physically separate the plates, providing access to every surface for complete cleaning, significantly reducing the risk of contamination and ensuring the longevity of the chiller.
Step-by-Step Cleaning Process For Brazed Plate Chillers
- Immediate Backflushing: The first step after any brewing session should be to backflush the chiller with hot water. This process helps to remove loose particles and wort residues before they have a chance to settle. Running hot water in the reverse direction of the wort flow can dislodge most of the debris caught in the chiller’s plates.
- Chemical Cleaning for a Deep Clean: Sometimes, backflushing with water isn’t enough to remove all the residues, especially if they’ve been allowed to dry or have built up over multiple brewing sessions. In these cases, a more thorough cleaning is required. Circulate a cleaning solution through the chiller, such as EBW (Exchilerator Brewery Wash), which is designed to break down organic material and residues without damaging the chiller. It’s essential to ensure that this solution reaches every part of the chiller for a comprehensive clean.
- Thorough Rinsing: After using any chemical cleaners, it’s crucial to rinse the chiller thoroughly with hot water. This step ensures that no cleaning solution remains in the chiller, as these residues could affect the taste of your next batch of beer or harm the yeast.
- The Baking Method for Drying and Additional Sanitization: For those looking for an extra level of cleanliness, the baking method offers both drying and additional sanitization benefits. After rinsing, dry the chiller as much as possible and then place it in an oven at a low temperature (around 250-300°F) for a couple of hours. This method not only ensures the chiller is completely dry but can also help to kill any remaining bacteria or wild yeast. Note: This method should be approached with caution and is generally suitable for stainless steel chillers.
- Sanitizing Before Next Use: Despite thorough cleaning, it’s always wise to sanitize the chiller before its next use. This can often be achieved by running boiling wort through the chiller during the last 5-10 minutes of your next brewing session prior to flame out, ensuring any remaining microorganisms are killed.
Step-by-Step Cleaning Process For Commercial Plate Chillers
- Disassemble the Chiller:Begin by carefully disassembling your commercial plate chiller. This will typically involve loosening and removing bolts or clamps that hold the plates together. Take care to keep track of all gaskets and seals to ensure a proper reassembly. It’s advisable to consult the manufacturer’s guide for specific disassembly instructions to avoid damage.
- Pre-Rinse Plates with Hot Water: Once disassembled, rinse each plate with hot water to remove loose debris, hop residue, and sediment. This initial rinse is crucial for easing the cleaning process, as it gets rid of the bulk of residues that can be removed without chemicals. Ensure that the water is hot enough to effectively remove residues but not so hot as to cause injury.
- Soak in Brewery Wash or Caustic Cleaner: Prepare a solution of brewery wash or a caustic cleaner according to the manufacturer’s recommendations. Submerge the plates in the solution, ensuring they are fully covered. Allow them to soak for the time specified by the cleaner’s instructions, usually between 20 minutes to an hour. This soaking period allows the chemical solution to break down organic residues and mineral deposits effectively.
- Scrub Plates If Necessary: After soaking, inspect each plate. If residues remain, use a soft-bristled brush to gently scrub the plates, paying special attention to areas with visible buildup. Be careful to use a brush that is effective enough to clean but soft enough to not scratch or damage the plates.
- Rinse Thoroughly: Rinse each plate thoroughly with hot water to remove all traces of the brewery wash or caustic cleaner. It’s essential to ensure that no chemical residue remains, as this could affect the taste of your beer or damage the chiller upon reassembly. Consider using deionized water for the final rinse to avoid mineral deposits.
- Dry and Reassemble: Allow the plates to air dry completely or use clean, lint-free towels to dry them manually. Once dry, reassemble the plate chiller, taking care to replace gaskets and seals correctly to avoid leaks. Tighten bolts or clamps to the manufacturer’s recommended specifications.
Final Check:
Before returning the chiller to service, perform a final inspection to ensure everything is correctly assembled and that there are no leaks. A water test run can help confirm that the chiller is properly reassembled and ready for use.
Final Thoughts On Plate Chiller Cleaning
Cleaning a plate chiller may seem daunting due to its complex design, but with the right approach and regular maintenance, it can be managed effectively. A clean plate chiller not only ensures the efficiency of your cooling process but also the quality and safety of your beer. By following these steps, you can maintain a pristine brewing setup, ready for countless successful brewing sessions to come.
Having delved into the details of keeping plate chillers pristine, we now turn our attention to immersion chillers. The simplicity of their design and operation makes immersion chillers a favorite among many brewers, but they are not without their cleaning challenges, especially when it comes to those hard-to-reach areas created by fasteners and coils. Here’s how to ensure your immersion chiller remains a reliable companion in your brewing adventures.
How to Clean an Immersion Chiller
Immersion chillers are a staple in the home brewing community, valued for their simplicity and efficiency in cooling wort rapidly. These devices, typically made from coiled copper or stainless steel, are submerged directly into the boiling wort, which means they require meticulous cleaning to maintain performance and beer quality. While the cleaning process is straightforward, attention to detail is crucial, particularly when it comes to any fasteners that might hold the coils together.
Quick Overview:
- Immediate Rinse: Always rinse the immersion chiller with hot water immediately after use.
- Deep Clean as Needed: Use a brewery-specific cleaner for a thorough clean.
- Special Attention to Fasteners: Clean around wires, brackets, or ties diligently.
- Sanitize Before Each Use: Boil in wort for the last few minutes of your brew.
- Dry and Proper Storage: Ensure complete drying before storing in a clean environment.
Understanding the Need for Deep Cleaning
The chiller, a critical component in the brewing process, is susceptible to the buildup of organic residues and mineral deposits. These can originate from the water and ingredients used in brewing, leading to decreased efficiency, potential contamination, and ultimately, a compromise in the quality of the brew. Regular maintenance routines often target these buildups, but they may not always be sufficient, especially in the nooks and crannies of fastened areas.
The Importance of Preserving the Patina
One of the unique aspects of chillers, especially those used in brewing, is the naturally formed patina that develops over time. This patina is not just a sign of age; it plays a role in the chiller’s functionality. Harsh cleaning methods can strip away this layer, leading to potential damage and a decrease in efficiency. The use of a mild detergent, like our brewery wash, ensures that the patina is preserved, maintaining the integrity and performance of the chiller.
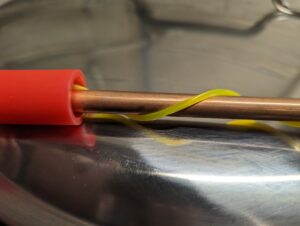
The Challenge with Fasteners
In many immersion chillers, the coils are secured by copper or stainless steel wires, twisted wires, brackets, or ties. These components are essential for the structural integrity of the chiller but can present unique challenges during cleaning. The grooves and areas where they contact the coil can trap hop residues, proteins, and other particulates from the brewing process. If not properly cleaned, these areas can become breeding grounds for bacteria, potentially affecting the flavor and safety of your beer.
Effective Cleaning and Maintenance Tips For Immersion Chillers
- Initial Cleaning Steps: Start with a hot water rinse immediately after use to remove the majority of the residue. This step is vital for preventing any particulates from hardening and becoming more difficult to clean.
- Dealing with Stubborn Buildup: For chillers with fasteners, use a small brush, such as a toothbrush, to scrub around and underneath any wires, brackets, or ties. This targeted approach ensures that you dislodge any trapped debris.
- Soaking for a Deep Clean: In cases of significant buildup, soaking the entire chiller, focusing on the fastened areas, in a warm water and mild detergent solution can be incredibly effective. Products like Exchilerator Brewery Wash are designed to break down organic residues safely, without removing or damaging your naturally formed patina.
- Rinse and Sanitize: After cleaning, a thorough rinse is necessary to ensure no cleaner residue remains. Before the next use, sanitize the chiller by submerging it in the boiling wort during the last few minutes of your boil, ensuring every part, including the fasteners, is bacteria-free.
- Drying and Inspection: Thoroughly dry the chiller before storage and conduct a final inspection to ensure cleanliness, especially around any fasteners. Proper drying is essential to prevent any bacterial growth or corrosion.
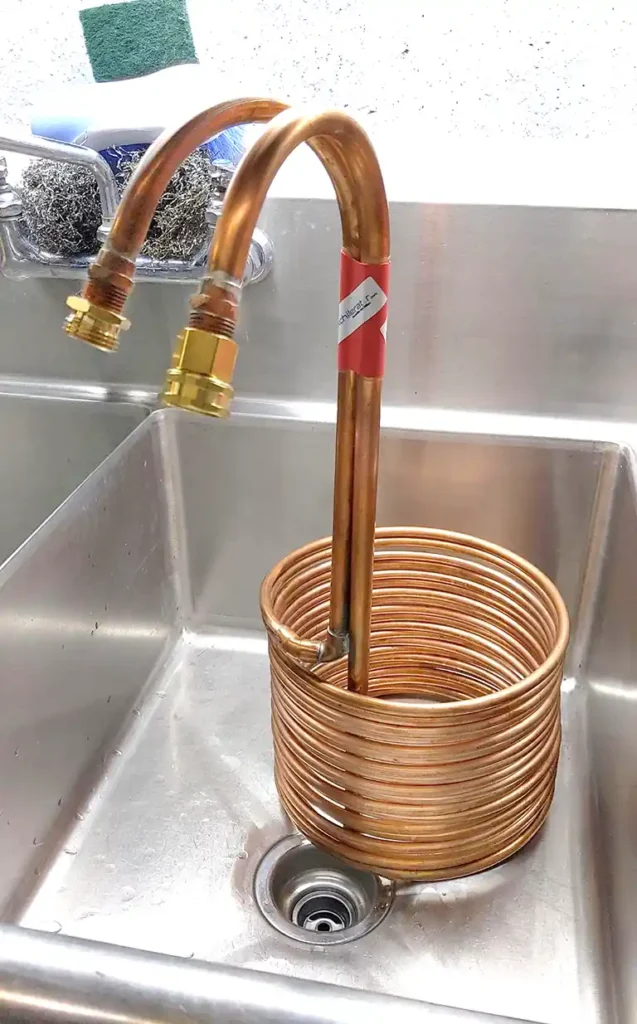
The Mongoose 75′ Tri-Coil Immersion Chiller
For those seeking a hassle-free solution, our Mongoose 75′ Tri-Coil Immersion Chiller offers a significant advancement in chiller design. Unlike traditional models, the Mongoose 75′ Tri-Coil has no wires, straps, or ties holding it together, eliminating those hard-to-clean areas entirely. This innovative approach not only simplifies the cleaning process but also enhances the overall efficiency of cooling your wort. Learn more about the Mongoose 75′ Tri-Coil Immersion Chiller here.
Conclusion
Maintaining an immersion chiller is key to ensuring the quality and safety of your homebrewed beer. While traditional chillers with fasteners require careful cleaning to avoid contamination, innovations like the Mongoose 75′ Tri-Coil Immersion Chiller are designed to make the brewer’s life easier by simplifying maintenance and cleaning. Regardless of the chiller you use, investing time in proper cleaning and maintenance pays dividends in the quality of your brews.
Final Thoughts
Throughout this guide, we’ve navigated the cleaning intricacies of counterflow, plate, and immersion wort chillers, each with its unique design and specific maintenance needs. While each type has its advantages, the counterflow chiller emerges as a standout for both its chilling efficiency and ease of cleaning. The counterflow design allows for a rapid cooling process, which is crucial for preventing bacterial growth and ensuring a crisp, clean brew. Additionally, its structure tends to be more straightforward to clean and sanitize thoroughly, reducing the risk of contamination and off-flavors.
Choosing the right chiller for your home brewery depends on various factors, including batch size, space considerations, and personal preference. However, for brewers prioritizing ease of maintenance without compromising on cooling efficiency, the counterflow chiller offers a compelling blend of both. Remember, the key to exceptional beer lies not just in the art of brewing but in the meticulous care of your equipment. Happy brewing!